How to Design Custom Cables?
Custom cable design is essential for many applications, from charging to data transmission, and it involves a meticulous process that accounts for various factors like usage,
materials, and environmental conditions. Here's a guide to designing custom cables for your specific needs.
Why Use Custom Cable Design?
Custom cables provide tailored solutions for devices that require specific power or data transfer characteristics.
Whether you're designing cables for industrial machines, medical devices, or automotive use, custom cables ensure compatibility, reliability, and durability that standard cables may not offer.
Steps to Design Custom Cables
-
Define the Purpose of the Cable:
-
Is the cable designed for charging only, or does it need to support data transfer as well?
-
Consider the main device and any peripherals (such as sensors or monitors) the cable will connect to.
-
Understand Power and Data Transfer Protocols:
-
Identify the power requirements (e.g., voltage and current).
-
Define the data transfer protocols required, such as USB, Ethernet, or proprietary communication standards.
-
Consider the Environment and Usage:
-
Is the cable for general, everyday use, or does it need to withstand heavy usage, medical environments, or harsh conditions like extreme temperatures or outdoor exposure?
-
Factor in bending and long-term durability, especially for cables that will undergo frequent movement, such as in robotics or industrial applications.
-
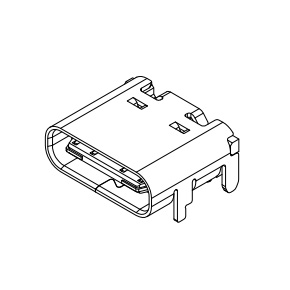
Select Connectors:
-
Choose from various connectors, such as Connector 1, Connector 2, or Connector 3, based on your application needs.
-
Decide whether to use brand-name connectors or equivalent ones.
-
Choose the Right Tooling Design:
-
Select the appropriate molding design based on the application field. For example, special shape molding, angle-specific molding, or structural molding designs..
-
Choose Wire Materials:
-
Decide on wire structure, AWG (American Wire Gauge), color, and the material for the wire jacket (PVC, TPE, TPU, etc.).
-
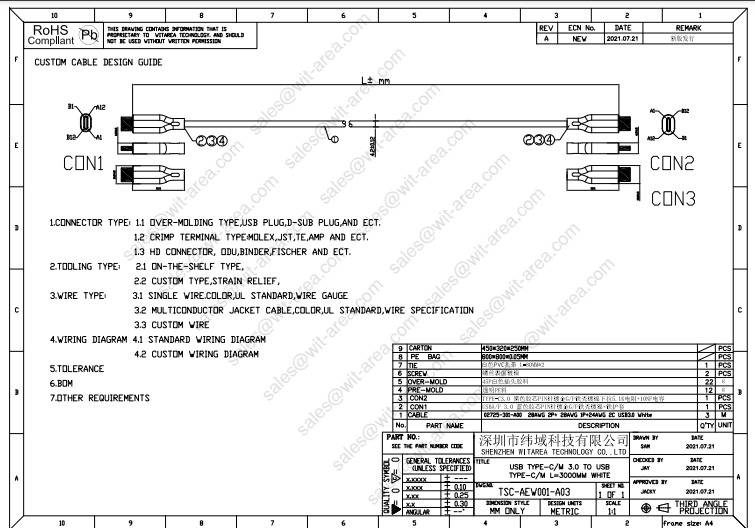
Design the Wiring Diagram:
-
Define current and voltage ratings for the cables.
-
Draw out the wiring diagram, ensuring that all components meet design specifications.
-
Specify Tolerances and BOM:
-
Mark tolerance levels and include a Bill of Materials (BOM) in the datasheet.
-
Determine the test methods to ensure the design meets performance criteria.
-
-
Transform the Design into Samples:
-
Once the design is finalized, send it to the assembly factory for evaluation. Ensure that the tooling design is feasible and that assembly is possible.
-
Prototype and Testing:
-
After receiving confirmation from the factory, proceed with mold creation and sample production. The mold cycle usually takes between 7 to 14 days, and material procurement can happen simultaneously.
-
Once samples are made, perform functionality and appearance tests.
-
Finalization of Production:
-
Once the samples are tested and approved, set the production schedule. The mass production phase can be tracked in real-time to ensure timely delivery.
 English
 中文
中文